This article describes our new methods to easily join KNX group addresses – i.e. assigning read and write addresses to each other – in the ayControl Editor. While this can be very time consuming if done manually, our automatic methods can help you to join hundreds of addresses within minutes. It’s completely hassle-free and helps you to save a lot of your valuable time.
Importing Addresses from the ETS
First, start a new project in the ayControl Editor and add a KNX connection. Now click on „ETS import“, where the Editor can automatically import the ETS exported group addresses as .knxproj file. Since the ETS doesn’t join corresponding read and write addresses to each other, this must be done in the Editor. Here, its new handy features come in Action:
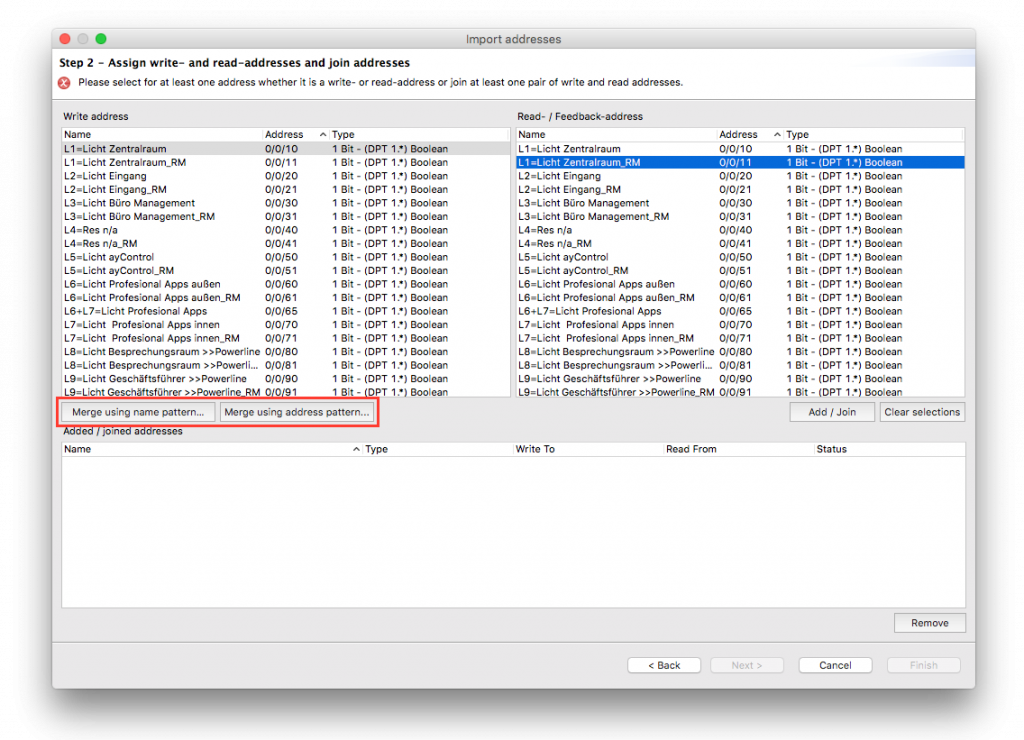
After all addresses have been assigned a data type (when importing a .knxproj file, this is done automatically), you get to the address joining overview. In both columns, all addresses are listed. Select in the left column the write address and in the right column the corresponding read/feedback address.
Now, as there are countless possibilities to define write and read addresses and nearly every installer or system integrator has its own address scheme, we offer two methods to import all of these correctly: importing by name pattern and importing by address pattern.
Joining group addresses via naming pattern
Let’s take a look at the joining via naming pattern first. Here it is assumed, that read and write addresses have the same name and only differ via a prefix/suffix from each other, e.g. “Licht Zentralraum” for switching the light and “Licht Zentralraum_RM” as the proper feedback address.
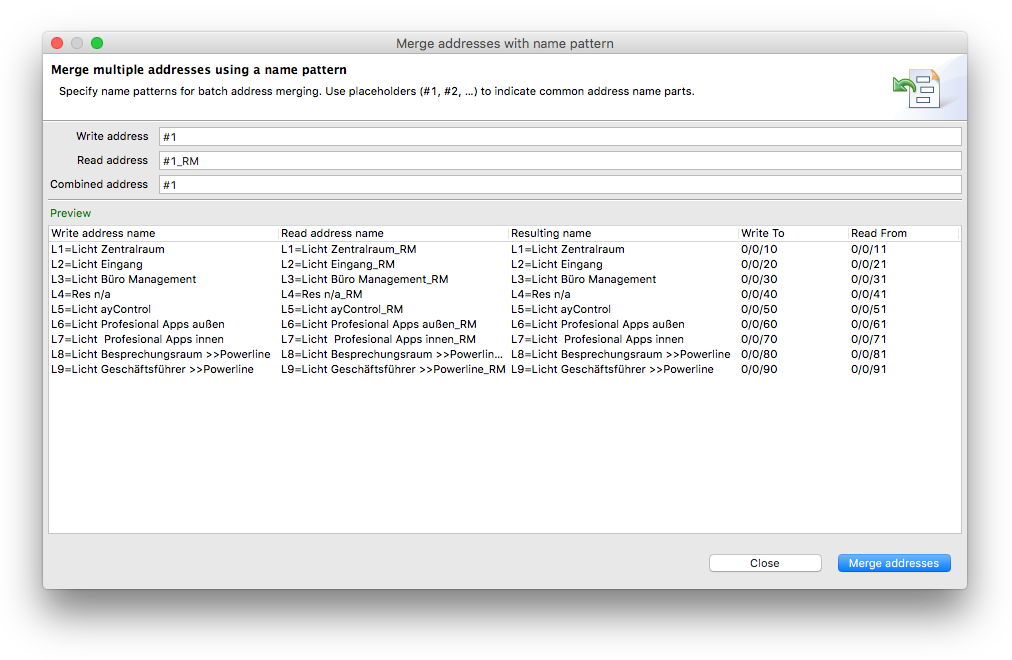
To use this Scheme, click on the desired write address in the left column (here: “Licht Zentralraum”) and the corresponding read address in the right column (here: “Licht Zenralraum_RM”). If you now click “Join using name pattern…” a new window pops up, where ayControl tries to find the pattern and automatically assigns the addresses which match it accordingly.
If something doesn’t work out as planned, you can edit the pattern via placeholders in this window (write address, read address and name of the resulting address). In our example, this would be “#1” as write address, “#1_RM” as read address and we take “#1” as name of the resulting address, where #1 is the a placeholder for the address.
If everything looks correct, you can click on “Join addresses”. By choosing “Finish”, everything is imported and we can go on configuring as usual.
Joining group addresses via address pattern
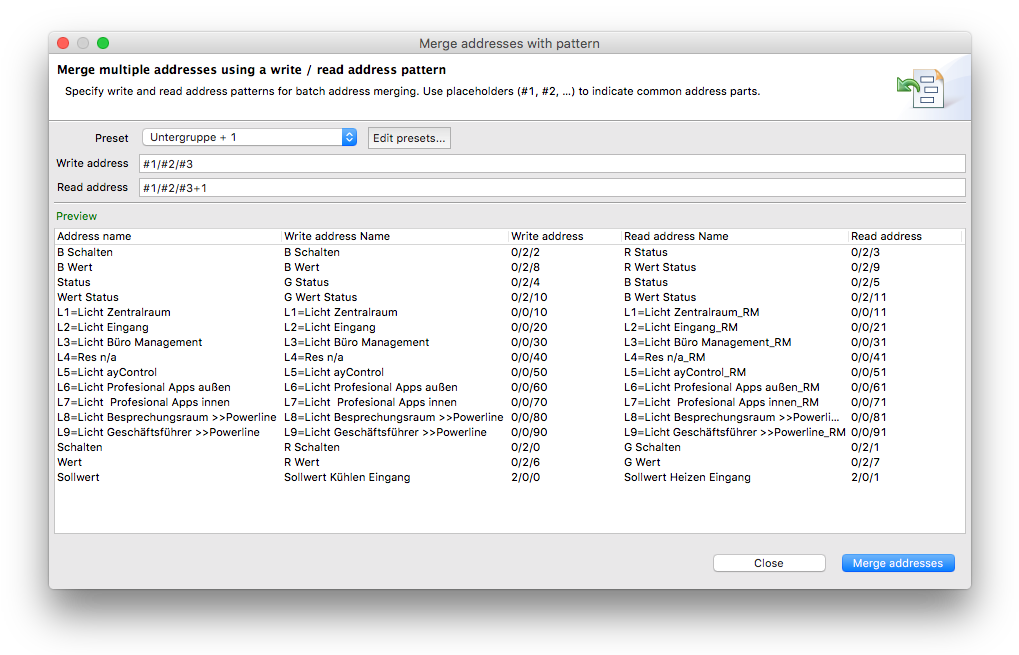
The second method for joining addresses is the so called joining via address pattern. Here, he names of the addresses are ignored, only the group addresses are important. We also have many possibilities how write and read addresses differ from each other, e.g. by one number in the sub group (Write: 0/0/60, Read: 0/0/61), 0 or 1 in the middle group (Write: 0/0/60, Read: 0/1/60) or reading and writing is done via the same address in some cases.
To get to the selection windows for the address pattern, simply select a corresponding pair of write and read addresses and click on “Join using address pattern…”. The editor tries to find a pattern. To change that pattern to another one, just select your desired pattern. You can find the ones described above and other common patterns in the drop down menu “Preset”. If you select e.g. “Subgroup +1”, all matching addresses are joined via the number in the sub group (Write: 0/0/60, Read: 0/0/61).
In the two input fields below, you can change the scheme according to your needs with placeholders, if the result isn’t as expected or if you are using an uncommon address scheme. In our example, the pattern for write addresses would be “#1/#2/#3 “and the pattern for read addresses would be “#1/#2/#3+1” (i.e. add 1 to the placeholder #3). If your scheme requires adaption, you can also save it as a preset, by saving it in the text document which opens via a click on the “Edit presets…” button.
If now everything was matched correctly, you can click on “Join addresses” and you’re done.
Useful Tip
If some mistakes occurred during the automatic joining of the addresses, e.g. a write address was assigned a wrong read address, you can select it in the list “Added / joined addresses” and click on “Remove” to put it back in the assigning area, where you can join it manually: Click on the desired write address on the left and select the according read address on the right and click “Add / Join”.