In this article, we will show you how to integrate Philips HUE lights with the new functions of ayControl KNX + IoT. In just a few steps, you will be able to fully control your HUE lights/groups and use them in EcoButler automation rules.
This new feature of ayControl KNX is a cost-efficient solution to integrate and control your Philips HUE lights in your KNX installation without investing hundreds of euros into additional hardware like HUE KNX Gateways.
If you have any problems during configuration, please refer to the “Troubleshooting & FAQ” section at the bottom of this article!
Creating the connection and using basic control elements
- Create a new IoT connection in the ayControl Editor and select “Philips HUE” from the list.
- After clicking OK, you can name your connection. e.g. “HUE Kitchen”
- Now, the control mode has to be selected. One connection can either control individual lamps or whole groups of lamps.If you want to control a single lamp, leave “single” here, if you want to control a group, type “group”.
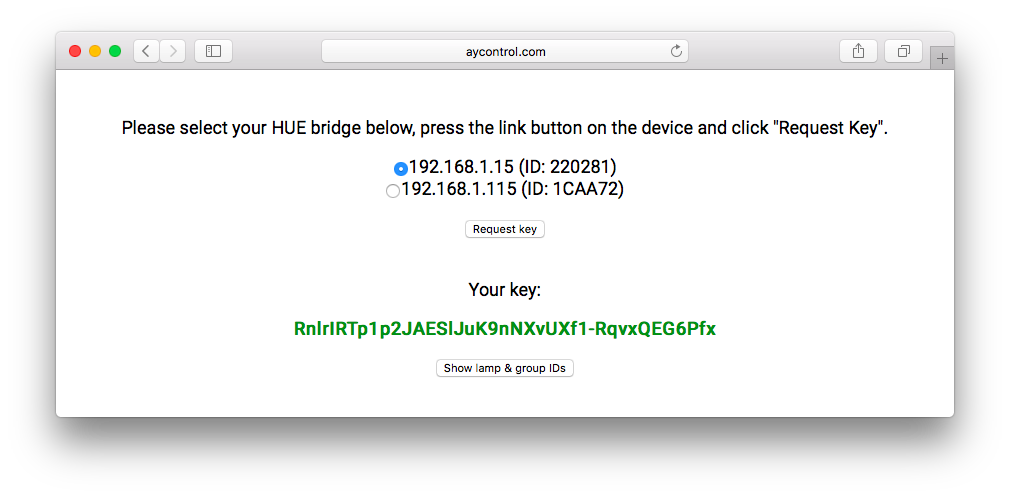
- The next thing the wizzard asks you, is your HUE authentication key. This is needed to authorise ayControl at your HUE bridge.To obtain this key, simply open our Configuration Helper with a computer in the same local network as your HUE bridge. You will be presented a list of bridges found. Select the one you want to configure, press the link button (located on the top of your HUE bridge) and click “Request Key” within 30 seconds. Copy the displayed key into the ayControl Editor.
- Now you need to specify the IP address of your HUE bridge station. As you already noticed, it is also displayed on our Configuration Helper, the one you selected (e.g. in our case “192.168.1.15”). Simply copy it from there.
- Finally, the target of the connection has to be specified. If you chose to control only a single lamp, type the ID of the lamp you want to control (e.g. “1”). If you chose to control a group, type the ID of the group (e.g. “3”). To easily find out the IDs of lamps and groups, you can click on “Show Lamp & Group IDs” on our Configuration Helper after requesting the key.
Your HUE connection is now ready to use, the basic controls should work now!
Configure the RGB color light control element
If you also want to use the ayControl KNX RGB color light control element, you will need a special configuration for the Philips HUE.
- Create a new RGB color light control element.
- Select the the “Red value”, “Green value” and “Blue value” addresses for the Red, Green and Blue channel in the wizzard respectively.
- Select the “Switch” address in the next step.
- Give your RGB color light control element a label.
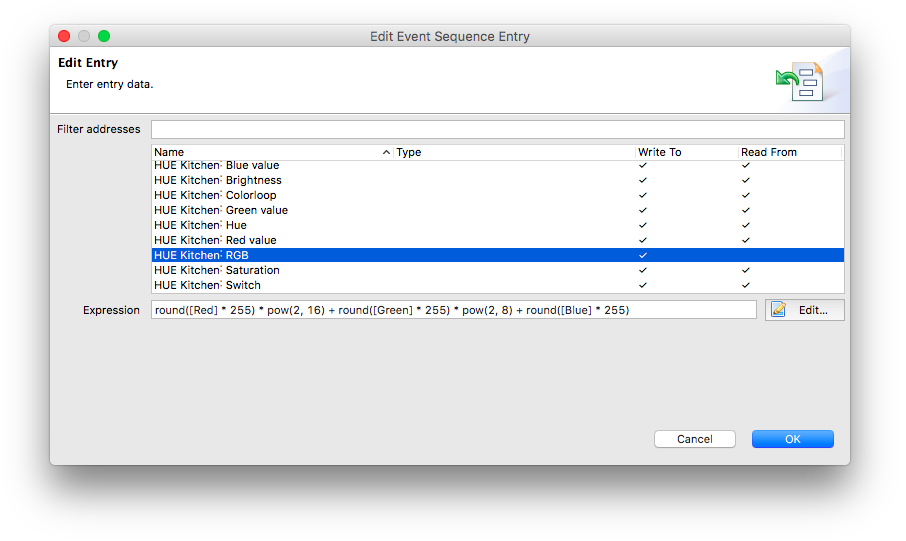
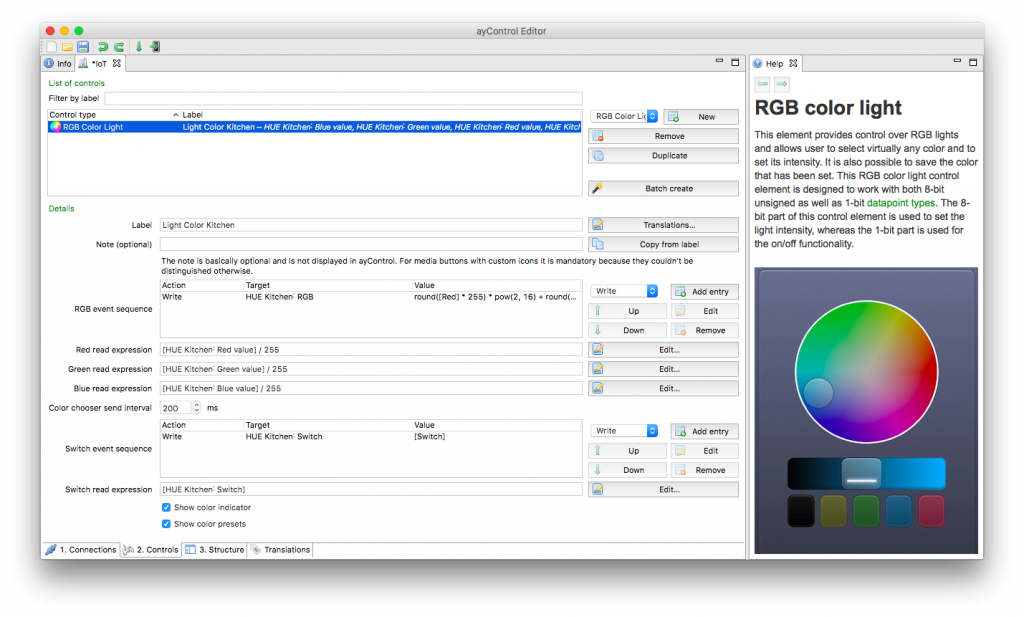
- Remove all entries in the “RGB event sequence” list.
- Add a new entry with the “RGB” address as target and copy the following into the expression field:
round([Red] * 255) * pow(2, 16) + round([Green] * 255) * pow(2, 8) + round([Blue] * 255)
Important: Set “Color chooser send interval” to at least 1000ms. The HUE cannot handle many requests at a time, so we must make sure not to overload it.
If your final configuration looks somewhat like in the image below, your RGB color light control element is now configured and can be used correctly.
Troubleshooting & FAQ
Q: Why does the Configuration Helper say “No HUE bridge found!”?
A: Make sure your computer is in the same network as your HUE bridge and the HUE bridge is turned on and connected to the network.
Q: How do I know which HUE bridge IP address to use?
A: If you have multiple HUE bridges, you need to select the IP address of the one you want to control. If you are unsure, you can look it up in the official Philips HUE App.
Q: How do I edit or create groups?
A: Groups are essentially labeled “Rooms” in the official HUE App, by creating or editing rooms, you can create or edit groups there.